

I know that for most of you the simple thought of building a hand plane would result in the shaking of heads and rolling of eyes. However for a small group of woodworkers making your own plane is a rather a rite of passage. And so it was that I made a hand plane.
I’ve long wanted to do this, but could never really prioritise it amongst other projects on the list. However with the world in crisis (COVID 19, May 2020), my general mood has matched the autumn season. All motivation to tackle significant projects is missing. In fact this project came about by forcing myself to get in the shed and do something, anything and trust that it would brighten my mood.
I have had two blades sitting on a shelf for several months. It was given to me when someone was doing a clean-up and had no idea what they were for. I suggested a plane blade perhaps, so he gave them to me instead of sending to the bin. At 50 and 60 mm wide respectively, they are the same as standard #4 and #4 1/2 blades. I have no idea what steel they are, though it is very bright (never developed a dull oxidized surface), almost like high grade stainless. Sharpening, it appears harder than my old Stanley and record irons. My best guess is that someone had a crack at making the blades, then lost interest, forgot about them, or died and they got disposed of at the local men’s shed.
They came with a 25° hollow grind, so I imagine was intended for a bevel up plane.


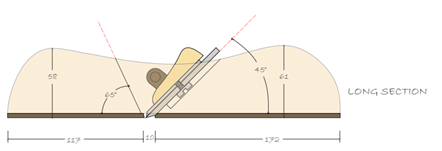
The evening before I made the plane I glued a couple of pieces of Tasmaninan Oak to create a large enough blank. Incidentally they were offcuts from my bench build that I had forgotten about. The next morning saw me cut off the two sides and then cut the throat out of the centre section. I set the iron bed at 45° with the front of the throat at 60ish°. If you’ve not yet guessed by the angles, this will operate as a bevel down plane with the standard bench plane geometry. Finally with all the pieces cut out, it was glued together.


Knowing that Tasmanian Oak isn’t a very hard wood, I decided to laminate a 4 mm pad of spotted gum to the base.
Then it was onto drilling and mounting the wedge pin and fashioning a wedge.


And that was it. The plane was done. It took a little bit of tuning to the wedge and a lot of tapping with a hammer to get the blade set for a fine shaving, but I got there.


It’s not all rainbows and unicorns though …
My pushing hand slipped at one point though and smashed my fingers into the back of the blade. I hopped around a little bit as I considered my misfortune.
It’s pretty hard to make fine adjustments, which I put down to a wedge with too severe an angle. At some point I will trim it down or make a new one to facilitate easier adjustment. The final point is that the blade really needs to be re-ground to a higher angle if I’m using it bevel down. At 25° the cutting edge is very thin and fragile. when used bevel down there is simply not enough metal to adequately support the edge and it has already chipped at some points.

At some point I’ll get motivated and make another one, but for now I’ve scratched that itch and have a new appreciation for my rickety old record #4 and it’s almost magical blade advancement wheel.
It currently lives with my saws because there’s no place in my tool chest!

April 2020
? There is a certain amount of brain-fry to considering this. You make it seem simple enough, but there is certainly maths involved – which sends me running. I take my hat off to you for doing this!
It is really difficult, but how else does a man impress his wife?